Assignment-3
Detailed problem statement and our code/submissions is available here.
Task 1: Localization Problem
codes are available here
Problem Statement
The task is to do the localization along with classification for the given images. With object localization the network identifies where the object is, putting a bounding box around it. Additionally, class label for particular detected object would be given by this network. In other words, the neural network will output the four numbers (for bounding box), plus the probability of class labels.
Pre-processing
- Converted all images to dimensions to 224*224 pixels using linear interpolation. This helped in dealing with images of various dimensions available in different classes. Images were resized to (224, 224, 3). The corresponding bounding boxes coordinates were also resized accordingly.
- Resized coordinates of bounding boxes according to new image size
ratio = NEW_IMAGE_SIZE/OLD_IMAGE_SIZE (new_x1, new_y1) = (ratio\*x1, ratio\*y1) - Normalized images by dividing each pixel by 255
Model
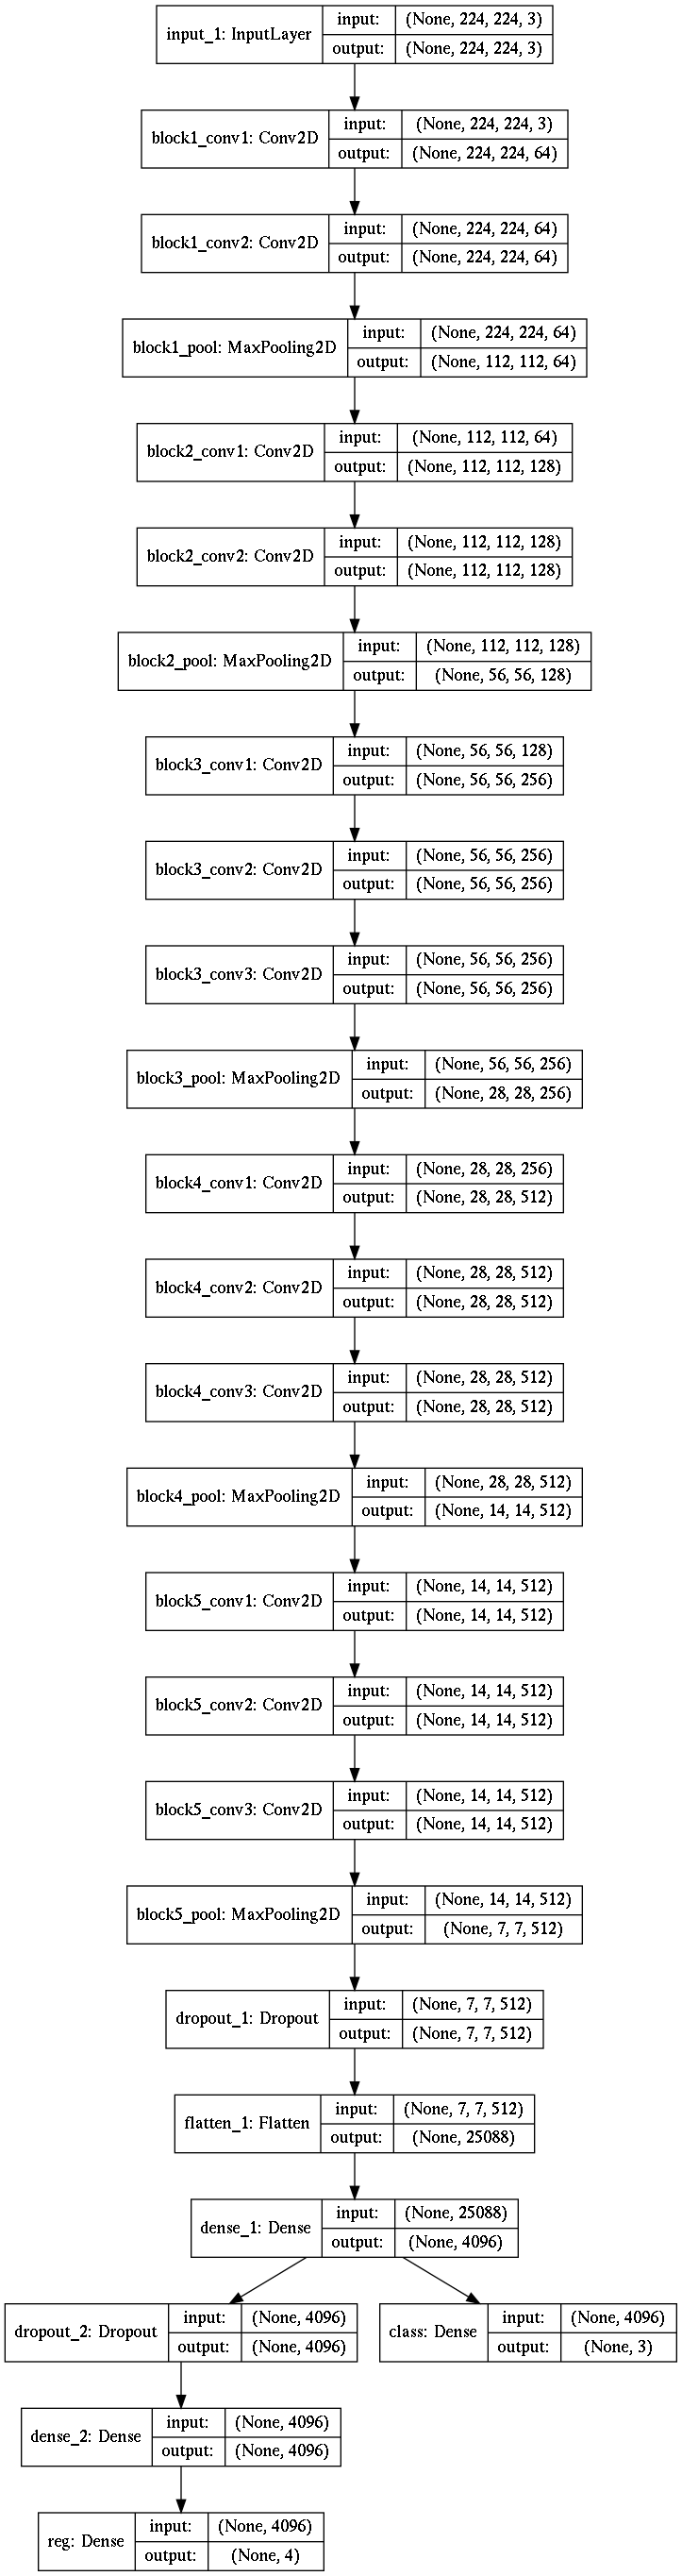
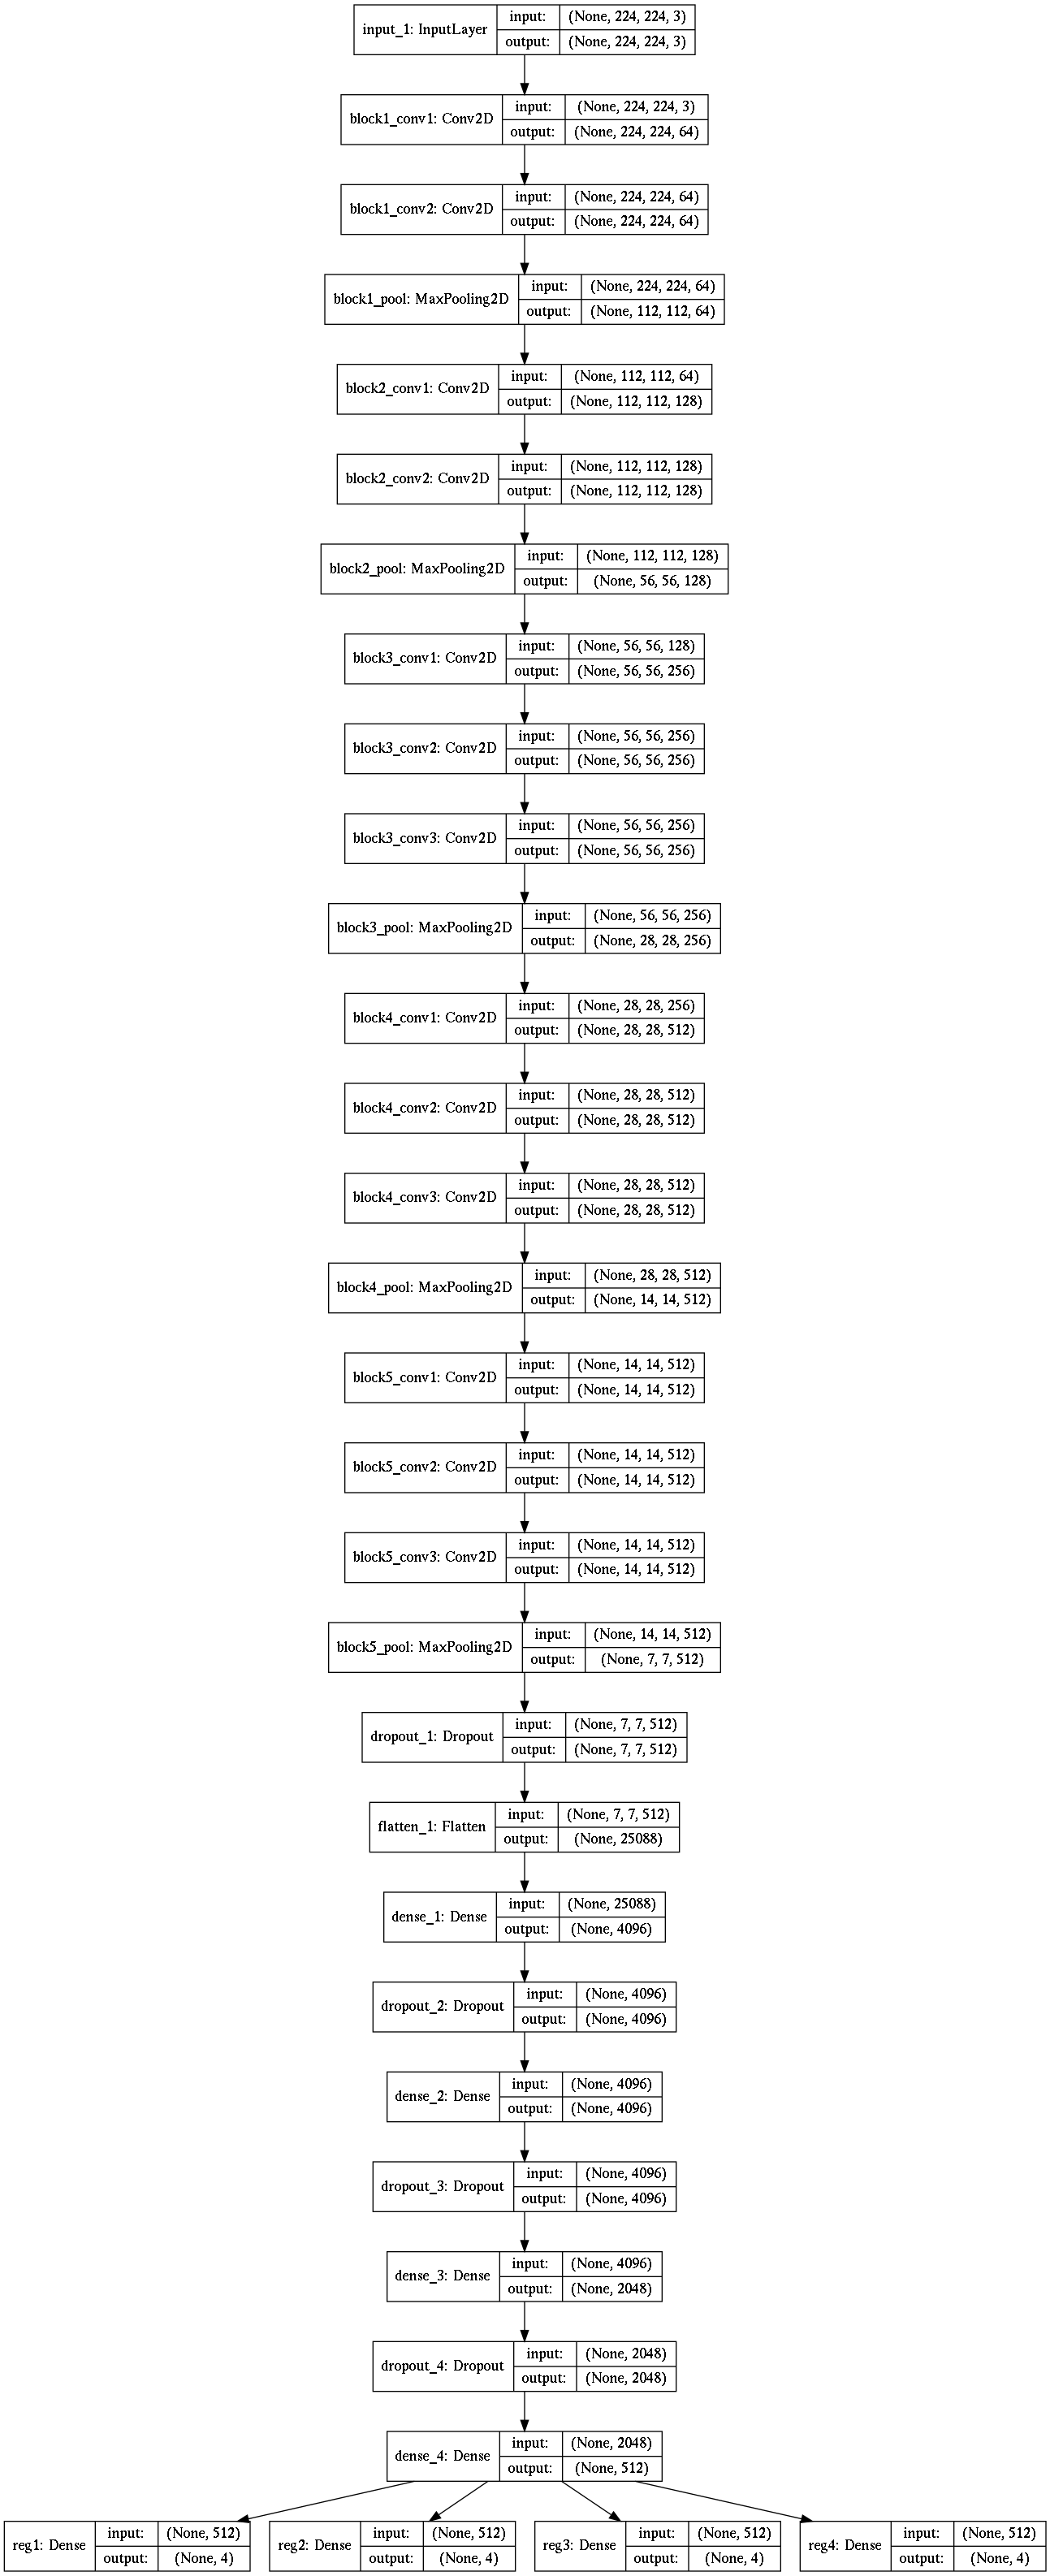
I used a VGG16 as base model.
model=VGG16(include_top=False, weights=None, input_shape=(224,224,3))
After getting conv. layer from VGG16, I created two separate networks - one for classification and other for regression.
- Optimizer=Adam
- Loss= {‘classification’:’categorical_crossentropy’,’regression’:’mean_squared_error’}
Model Architecture : Part 1 (single object)
Model Architecture : Part 2 (multiple object)
Task 2: Pixelwise Image Segmentation
codes are available here
Extract the files in the same directory which contains “Data” and “Mask”, lets call it root.
Please download the file vgg16_weights_tf_dim_ordering_tf_kernels_notop.h5 file from link below and keep it in root folder:
https://github.com/fchollet/deep-learning-models/releases/download/v0.1/vgg16_weights_tf_dim_ordering_tf_kernels_notop.h5
################################################################################################
Make sure you have following files/folders in root:
-
An empty folder named “results”. This will contain all the graphs produced after successful execution of code. After is time you want to rerun the code, empty the “results” folder.
-
A file named “vgg16_weights_tf_dim_ordering_tf_kernels_notop.h5”. This contains pre-trained weights for FCN8 model, so we don’t need to train from scratch.
-
A files named “results.out” this will contain output data like, accuracy and loss.
################################################################################################
To run the code, just type the following command on terminal”
python3 main.py
################################################################################################
Please make sure following libraries are already installed:
import tensorflow as tf from keras.backend.tensorflow_backend import set_session import keras, sys, time, warnings from keras.models import * from keras.layers import * import cv2, os import numpy as np import matplotlib.pyplot as plt import seaborn as sns import random from sklearn.utils import shuffle from keras import optimizers
import sys
################################################################################################
After successful execution, following results will be produced:
File named “results.out” will be filled with output data
Folder named “results” will be filled with output plots
################################################################################################
Please alter the number of epochs on line number 228
Task-3 : Core Point Detection in Fingerprints
Problem Statement
Core point refers to the centre point of a fingerprint image and is found in the middle of spiral. Task is to find ”Core Point” on a fingerprint image captured through different sensors.
Pre-processing
-
Converted position of Core-Point as a ratio of the image dimensions. This helped in dealing with images of various dimensions. Initially, the regression problem was giving results that were not even in the image dimension. For example, in image of 320*480, the neural network detected the core-point at (2580,1368), which is impossible. On doing this pre-processing, the core-point detected was atleast within image dimension.
- Converted all images to dimensions to 320*480 pixels using linear interpolation.
- Converted all images to black-and-white using Adaptive Threshold : This made sure that only data of finger-print was recorded, and the background gradient noise was filtered out.
im = cv2.imread(input_data,cv2.IMREAD_GRAYSCALE)
tho = cv2.adaptiveThreshold(im,255,cv2.ADAPTIVE_THRESH_GAUSSIAN_C,cv2.THRESH_BINARY,15,5)
- Orientation Field using Sobel filters According research, the core-point is located in a vortex with ridges forming a unique orientation pattern around the core-point.
def go(img):
    sobelx = cv2.Sobel(img,cv2.CV_64F,1,0,ksize=5)
    sobely = cv2.Sobel(img,cv2.CV_64F,0,1,ksize=5)
    po = 2 * sobelx * sobely
    go = pow((sobely*sobelx),2)
    a = 0.5*np.arctan2(sobely,sobelx)
    oy = cv2.blur(np.sin(a),(5,5))
    ox = cv2.blur(np.cos(a),(5,5))
    angle = sigmoid(np.arctan2(oy,ox))
    return angle

Model
I have used a simpler version of AlexNet
- Optimizer=Adam(lr=0.0005, decay=0.00001)
- Loss= ‘mean_squared_error’
Model Architecture :
# Layer 1
alexnet = Sequential()
alexnet.add(Conv2D(96, (11, 11), input_shape=(320,480,1),padding='same', kernel_regularizer=l2(0)))
alexnet.add(BatchNormalization())
alexnet.add(Activation('relu'))
alexnet.add(MaxPooling2D(pool_size=(2, 2)))

# Layer 2
alexnet.add(Conv2D(256, (5, 5), padding='same'))
alexnet.add(BatchNormalization())
alexnet.add(Activation('relu'))
alexnet.add(MaxPooling2D(pool_size=(2, 2)))

# Layer 3
alexnet.add(ZeroPadding2D((1, 1)))
alexnet.add(Conv2D(512, (3, 3), padding='same'))
alexnet.add(BatchNormalization())
alexnet.add(Activation('relu'))
alexnet.add(MaxPooling2D(pool_size=(2, 2)))

# Layer 4
alexnet.add(ZeroPadding2D((1, 1)))
alexnet.add(Conv2D(1024, (3, 3), padding='same'))
alexnet.add(BatchNormalization())
alexnet.add(Activation('relu'))

# Layer 5
alexnet.add(ZeroPadding2D((1, 1)))
alexnet.add(Conv2D(1024, (3, 3), padding='same'))
alexnet.add(BatchNormalization())
alexnet.add(Activation('relu'))
alexnet.add(MaxPooling2D(pool_size=(2, 2)))

# Layer 6
alexnet.add(Flatten())
alexnet.add(Dense(3072))
alexnet.add(BatchNormalization())
alexnet.add(Activation('relu'))
alexnet.add(Dropout(0.5))

# Layer 7
alexnet.add(Dense(4096))
alexnet.add(BatchNormalization())
alexnet.add(Activation('relu'))
alexnet.add(Dropout(0.5))

# Layer 8
alexnet.add(Dense(2))
alexnet.add(BatchNormalization())
alexnet.add(Activation('relu'))
return alexnet